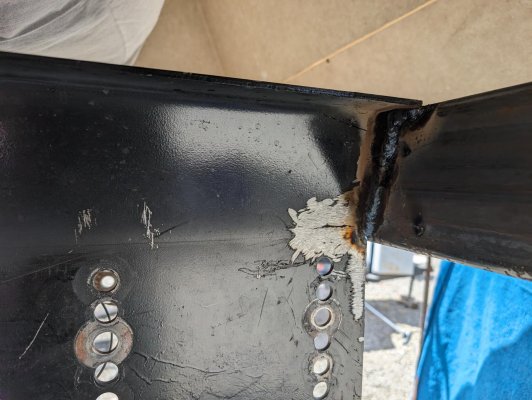
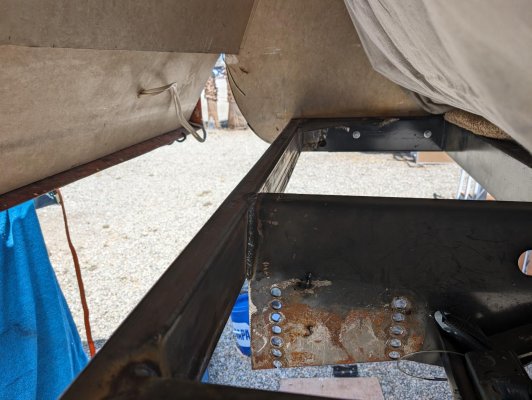
Broken front beam on the pin box mounts, the path to repair.

sourdo

Advanced Member
Joined
Dec 11, 2022
Messages
30
There is so little good intel on this issue, I decided to start this thread, to help anyone in this situation to know it can be fixed!

I have a 2009 Sierra FR 255 RL 5th wheel Rv. We bought it used two winters ago, and my wife and I live in this full time. Like any Rv, new or used, they need TLC and work. And I have repaired many deficiencies to date, and so far we have really put on the miles, and enjoyed it.

A few days ago, I noticed the frame flex when hitching up, seemed to be increasing. The next night at a BLM campground, I left the RV on the hitch. My wife as we were getting into bed, pointed out the bowed paneling near the bed.

Uh oh.

The next morning I grabbed a flashlight for a look/see inside the pin box, Uh oh... I saw cracks. On high alert, and driving 55 mph, we had 450 miles to go to our destination, our winter home for some brief Doctor visits and for to see my Mom, in summer, near the Salton Sea California. It's like being on the face of the sun. And we made it in two days safe and sound.

You can only work for a few hours in the very early crack of dawn morning, but in 4 hours in the morning, I had the front pulled apart where I could see what was going on. The front beam, cheezy cheap very thin 2x5 inch tube, was busted in half. I measured it, not even 1/8 inch.

I quickly found out this is a common problem with Lippert frames from that time. The fix? Weld it up and move on.

Now to find a welder dude was my first action. When we got to our winter RV park home, we pay for year around access, the owner came up to say high. I told him my problem. He knows of no mobile welder dudes, but he does have a Miller welding on a trailer! Since I'm a retired welder fabricator, this was like sweet music.

In the heat I've been hacking out that piece with cutting disc's(no torch wanted, fire is bad), but it's a slow go when you only have a little time each day because of the heat.

So the steps were, pull the under panel off. I had just made a new underpanel with Filon and Luan plywood, another story, last winter. I saw no cracks then, 'cest la vie.

I then removed the bedroom cabinets and such from the front end, unscrewed the bed, and slid it out of the way as I had to remove a part of the floor. Welding and wood don't mix.

Then I removed the screws holding the fiberglass nose, finding two very long screws to hold the top on, but loose. Then I pulled the nose open like a clam, exposing the damaged beam.

Now I can start to hack out the bad piece. I didn't want to use a torch. Have you ever seen one of these burn? Nuff said.

So with thin grinding discs, I'm still working on getting things cleaned up. Any welding job, it is the prep work that takes the longest.

I bought a 10 foot piece of 2x5 tube today, only $113, and a real 3/16 inch. This will not break.

Here are some pictures so far. I learn so much from pictures, I hope this can help someone else. I'll add as I get things done, shouldn't take to long, but for this infernal heat.

The first picture is what I first saw the other night. I was worried of complete failure, but in all, it held up.

The rest of the pictures is where I'm currently at. I'll post more as I finish.
 

Attachments

  • PXL_20240601_152201566.jpg
    PXL_20240601_152201566.jpg
    277.1 KB · Views: 29
  • PXL_20240601_152128201.jpg
    PXL_20240601_152128201.jpg
    330.1 KB · Views: 29
  • PXL_20240601_151924188.jpg
    PXL_20240601_151924188.jpg
    357.6 KB · Views: 29
  • PXL_20240529_201157099.jpg
    PXL_20240529_201157099.jpg
    216.9 KB · Views: 36
Or in my case when the Pinbox frame broke after a TX (TX size) Pothole cracked the front Tube of the H Frame and the Fiver started bouncing on the Pickup rails we pulled into an RV Park and Called our Insurance Company and 3 weeks later we were back on the road after "Body Shop" and Mobile Welder rebuilt our Front End. 10K $ repair cost us the 1k$ deductible.
I'm not THAT much of a DIY!
 
lippert frame

thank you for the info and photos. I am not a welder but have a DRV 2009 which hmmm do I have a lippert frame? but can now take a look to see where I stand. the screws ome loose around my pin box holding the fiberglass skin below bedroom.
 
thank you for the info and photos. I am not a welder but have a DRV 2009 which hmmm do I have a lippert frame? but can now take a look to see where I stand. the screws ome loose around my pin box holding the fiberglass skin below bedroom.

DRV frame is made with two 2x6" tubing welded together than a 2x2" tube welded on top. It is built way stronger than how his 5th wheel frame was constructed.
 
I did lots of welding in my day. So I know you made it better than OEM with your skills.
Frame on DRV 5th wheels is one of many reasons I bought my used one back in 2019
 
I've got a 2007 model Carriage Carri-Lite, which was supposed to be in the higher end of 5th wheel RVs back then. We've not experienced any issues, but with all the chatter on YouTube etc with frame flex, I pulled off the underside as you did and inspected everything. While some of the welds don't look that pretty, everything seems to be holding together well. We switched to a Hensley Trailer Saver hitch with airbags last year and I think that helps soften the load on those big pot holes and bad roads. Looks like you are doing it well. If I wasn't a DIY type of guy, we'd have never been able to afford the maintenance & repair of our unit over the years.
 
VERY IMPRESSED.
I have a Montana 2007 3000RK.
had a emergency repair with double plates etc by a welder in Colorado.
The forward beam was cracked thru and thru.
the aft beam attach point was showing cracks and stress.
I did have some internal cabinet shifting indicators as well.

That was 2 years ago.
I plan on having the entire beam replaced soon after your pictures.
I am some what capable and have previously removed the under cover and front cap but am not a welder.
Lippert stuff is garbage.
but I love the rig so I guess I fix it and travel on.

Ron Z
 
Did I say it was hotter than hell?

Once I had the bed and closets removed I pulled up the floor, a 26 in x 8 ft piece of 1/2 inch plywood. I bought a new piece to replace it. Along with a small tarp to wrap the area exposed to the elements. I also hung a cloth painters tarp to keep the grinding dust and welding smells to a minimum.

Last Thursday I was up early to start welding but had some mechanical issues to fix on the welder. It has sat for two years, about the 4th time I started it the starter motor hung up, and when it went into high rpms, spun that starter to disintegration. $302 later with new starter, I got up early Friday to weld. By 10:30 AM it was 102 F and that was all I could do without falling into a heap.

I finished welding the next day, Saturday, about 7:30 AM and started to reassemble everything. As I could do inside work, I finished reinstalling the closets and bed that afternoon. Sweaty man..

On Sunday, thankfully, the heat backed off a bit, and the morning was pleasant. In my 4-5 hour window I was almost finished reassembling. Monday I had the trim to reinstall and some screws, and we left at 8:45 AM.

I'll give some guidance here on time spent, since it was so hot it was a drawn out affair.

So to tear things apart enough to work on the repair, about 4.5 hours

Cutting out the broken piece was about 3 hours. A sawzall would be useful, you can hack out the big pieces with a good metal blade. I only had a side grinder, but with thin cutting discs you can cut the metal easily.

Once prepped, I would call the welding time 6 hours.

I wiped off the metal, sprayed on some black paint, and started reassembly.

Getting everything back together takes longer, about twice what I did to take things apart. Call it 9 hours there.

I did not chalk yet. The heat made things gooey and the old chalking was hard to remove, I'll get to this in a day or so somewhere not so hot. We were desperate to get out of there.

The repair is good and stout, no more frame flex, but for very little, like 1/8 th inch. I do believe this was broken for quite a while, it took some time to manifest itself. I also gained back my bed rail clearance. Now the truck is taking the bumps, not the "bouncy" pinbox mounts.

The first picture is with the broken beam removed and ready to weld up.

I added some corner brackets to strengthen the corners where the new meets the old. I also reused the gussets I cut out to further add strength.

The last two pictures show the weld job finished.

Some tips, when removing the underpanel, I used the truck bed as a place to drop onto, and reinstall. It went back in easily, my wife helped. I lowered or raised the RV to get the underpanel close.

As for cost, I got out cheap. Even with buying a starter for the welder and a new welding hood with new side grinder, the other cheap one burnt up. I guess I spent about $500 in all. Labor is obviously the big cost here.

If you can do the taking apart, a good fresh experienced welder could to this quicker. That I was 15 years out of sync, made for a bit slower, and certainly not as pretty, but the welds are good.
 

Attachments

  • PXL_20240606_151017043.jpg
    PXL_20240606_151017043.jpg
    244.5 KB · Views: 12
  • PXL_20240607_174524765.jpg
    PXL_20240607_174524765.jpg
    236.1 KB · Views: 18
  • PXL_20240607_174631488.jpg
    PXL_20240607_174631488.jpg
    219.4 KB · Views: 11
  • PXL_20240608_170145479.jpg
    PXL_20240608_170145479.jpg
    221.4 KB · Views: 11
  • PXL_20240608_170149363.jpg
    PXL_20240608_170149363.jpg
    335.9 KB · Views: 12
I'm looking at better pinboxes myself. A Gen-Y or a Morryde.
 
Or in my case when the Pinbox frame broke after a TX (TX size) Pothole cracked the front Tube of the H Frame and the Fiver started bouncing on the Pickup rails we pulled into an RV Park and Called our Insurance Company and 3 weeks later we were back on the road after "Body Shop" and Mobile Welder rebuilt our Front End. 10K $ repair cost us the 1k$ deductible.
I'm not THAT much of a DIY!

10 GRAND? I was hoping for a post like yours, I was curious on what it costs to have a shop do this. Of course that is the "insurance price", but that is getting pretty greedy.

Thinking of the labor it took me to do this at say, $150 an hour, I'm not seeing that at all.
 
I did lots of welding in my day. So I know you made it better than OEM with your skills.
Frame on DRV 5th wheels is one of many reasons I bought my used one back in 2019

None of the OEM welds were broke, it is the metal next to welds that broke loose, in an area called the "Heat affected zone"

That thin metal for the 2x5 box metal was not up to the task of the pounding on freeways. I-40 is one of the worst, we hit a bump yesterday that was a grind your teeth hard, at full speed too with no warning at all. :(
 
I have a 2020 Vanleigh Pinecrest and have same issue. Lippert told me to go back to OEM. Looks like i will have to fix myself.
 
Sourdo
I have to do the same repair real soon
Im currently limping home….
I will open it up and have a welder do the metal work
Looks straight forward
I have had the underside open before.
Question In the forward closet
how hard was it to remove tbe plywood floor…
Im planning on first week of Feb to start prepping for the welder
 
My bed and cabinets were in front. Removed them, carpet and side trim. I removed fastners on plywood and kept as a stencil for new plywood since was water damage.
 
Sourdo
I have to do the same repair real soon
Im currently limping home….
I will open it up and have a welder do the metal work
Looks straight forward
I have had the underside open before.
Question In the forward closet
how hard was it to remove tbe plywood floor…
Im planning on first week of Feb to start prepping for the welder

Before the floor can be removed, I had to take out the bed and the two side closets. Everything is screwed down, but the plywood floor was fastened with nails. It comes up with a pry bar. I used self drilling screws to reassemble.

The PITA for us was having to continue living in the Rv for a week while repairing, you'll have a better time of it at your home.

Good luck, you'll have a better RV after the repair.
 

Try RV LIFE Pro Free for 7 Days

  • New Ad-Free experience on this RV LIFE Community.
  • Plan the best RV Safe travel with RV LIFE Trip Wizard.
  • Navigate with our RV Safe GPS mobile app.
  • and much more...
Try RV LIFE Pro Today
Back
Top Bottom